Delicious Apple Butter Copper Kettle Recipe: Easy And Flavorful!
Looking for a tantalizing recipe that will satisfy your craving for the perfect apple butter? Look no further! Today, I am here to share with you an incredible apple butter copper kettle recipe that will have your taste buds dancing with delight. This recipe is a tried and true method for creating that rich and luscious apple butter flavor that will leave you wanting more. So, let’s dive in and discover how to create this mouthwatering treat in the comfort of your own kitchen. Get ready to indulge in the irresistible flavors of this apple butter copper kettle recipe that will surely become a favorite in your home.

Apple Butter Copper Kettle Recipe
Introduction
Apple butter is a delicious and versatile spread that can be used in a variety of ways, from spreading on toast to using as a filling for pastries. Making apple butter in a copper kettle adds a unique and traditional touch to the process. In this article, we will explore the art of creating apple butter using a copper kettle and provide you with a step-by-step recipe. Grab your apron and let’s get started!
Gathering the Ingredients
Before diving into the process of making apple butter in a copper kettle, it’s important to gather all the necessary ingredients. Here’s what you’ll need:
- 10 pounds of apples (a variety of sweet and tart apples work best)
- 4 cups of granulated sugar
- 1 cup of apple cider vinegar
- 2 tablespoons of ground cinnamon
- 1 teaspoon of ground cloves
- 1 teaspoon of ground nutmeg
Preparing the Apples
To begin, wash and core the apples. It’s not necessary to peel them, as the skins will add depth of flavor and color to the apple butter. Cut the apples into quarters or smaller pieces, ensuring that they are roughly uniform in size.
Choosing the Right Apples
When selecting apples for making apple butter, it’s important to choose a mix of sweet and tart varieties to achieve a balanced flavor profile. Some popular choices include:
- Granny Smith
- Jonagold
- Golden Delicious
- Rome Beauty
- Jonathan
Tips for Efficient Apple Preparation
To make the preparation process quicker and more efficient, consider utilizing the following tips:
- Use an apple corer to remove the cores quickly.
- Invest in an apple slicer to cut the apples into uniform slices.
- Consider using an apple peeler if you prefer a smoother apple butter without the peel.
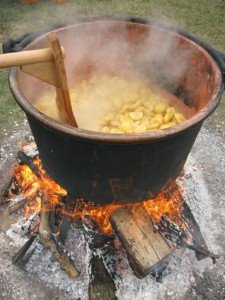
Using a Copper Kettle
While you can make apple butter using a regular cooking pot, using a copper kettle adds a unique charm and flavor. Copper conducts heat efficiently and evenly, allowing for better caramelization of the apples and enhancing the overall taste.
Benefits of Using a Copper Kettle
Here are some benefits of using a copper kettle for making apple butter:
- Even heat distribution: Copper ensures that the heat is evenly distributed, preventing hot spots.
- Enhanced caramelization: The copper reacts with the natural sugars in the apples, resulting in a deeper and richer caramelized flavor.
- Traditional touch: Using a copper kettle gives a nod to the traditional methods of making apple butter, adding a touch of nostalgia to the process.
The Cooking Process
Now that you have your ingredients ready and your copper kettle at hand, it’s time to start cooking the apple butter! Follow these steps:
Step 1: Place the Apples in the Copper Kettle
Transfer the prepared apples into the copper kettle. Make sure not to overcrowd the kettle, as the apples need space to cook down and release their juices.
Step 2: Add the Sugar
Sprinkle the sugar evenly over the apples. The sugar helps to sweeten the apple butter and aids in the caramelization process.
Step 3: Incorporate the Spices
Add the ground cinnamon, ground cloves, and ground nutmeg to the kettle. These spices will infuse the apple butter with warm, cozy flavors.
Step 4: Pour in the Apple Cider Vinegar
Add the apple cider vinegar to the kettle. This will provide a tangy contrast to the sweetness of the apples and balance the overall flavor.
Step 5: Cook the Apples
Place the copper kettle over medium heat and bring the mixture to a gentle simmer. Stir the apples occasionally to prevent sticking or burning.
Step 6: Simmer and Stir
Allow the apples to simmer for several hours, stirring occasionally. The cooking time can vary, but it typically takes around 6 to 8 hours for the apples to break down and transform into a smooth apple butter consistency.
Step 7: Testing for Doneness
To check if the apple butter is done, take a spoonful and place it on a chilled plate. If it holds its shape without excess liquid, it is ready. If it’s too runny, continue simmering until the desired consistency is achieved.
Canning and Storing
Once your apple butter has reached the desired consistency, it’s time to preserve it for later use. Follow these steps to can and store your delicious creation:
Step 1: Sterilize the Jars
Wash the canning jars, lids, and bands thoroughly with hot, soapy water. Rinse well, then place them in a large pot of boiling water for about 10 minutes to sterilize.
Step 2: Fill the Jars
Using a canning funnel, carefully ladle the hot apple butter into the sterilized jars, leaving about ¼ inch of headspace at the top. Wipe the rims of the jars clean to ensure a proper seal.
Step 3: Seal the Jars
Place the lids on the jars and secure them with the bands, tightening them just until finger-tight. Avoid overtightening, as it may prevent the jars from sealing properly.
Step 4: Process the Jars
Process the filled jars in a boiling water bath for about 10 minutes to ensure a good seal. Remove the jars from the water bath and allow them to cool on a towel-lined countertop.
Step 5: Store and Enjoy
Once the jars have cooled completely, check that each jar is properly sealed by pressing the center of the lid. If it doesn’t pop, the jar is sealed and can be stored in a cool, dark place for up to a year. Enjoy your homemade apple butter on toast, pancakes, or as a delightful ingredient in various recipes!
Making apple butter in a copper kettle is not only a delightful culinary experience but also a nod to tradition. The combination of sweet and tart apples, caramelization in the copper kettle, and the infusion of warm spices create a delectable spread that’s perfect for any occasion. Follow the steps mentioned in this article, and you’ll be rewarded with a batch of homemade apple butter that will surely impress your family and friends. So, put on your apron, gather your ingredients, and let the copper kettle work its magic!
Apple Butter – Secret Apple Butter Copper Kettle Recipe
Frequently Asked Questions
What ingredients do I need to make apple butter in a copper kettle?
To make apple butter in a copper kettle, you will need the following ingredients:
– 10 pounds of apples (a combination of different varieties for the best flavor)
– 2 cups of granulated sugar
– 2 cups of brown sugar
– 1 tablespoon of ground cinnamon
– 1/2 teaspoon of ground cloves
– 1/2 teaspoon of ground nutmeg
– 1/4 teaspoon of salt
– Juice of 1 lemon
How long does it take to cook apple butter in a copper kettle?
The cooking time for apple butter in a copper kettle can vary depending on the specific recipe and stove heat. However, on average, it takes around 8 to 10 hours to cook apple butter in a copper kettle. The slow cooking process allows the flavors to develop and the apples to caramelize, resulting in a rich and flavorful apple butter.
Can I use a different type of pot instead of a copper kettle?
Absolutely! While a copper kettle adds a traditional touch and may enhance the cooking process, you can still make delicious apple butter using a different type of pot. A heavy-bottomed stainless steel or cast-iron pot works well for cooking apple butter. Just make sure to adjust the cooking time and temperature accordingly to ensure proper caramelization and flavor development.
Do I need to peel the apples before making apple butter?
In most apple butter recipes, it is recommended to peel the apples before cooking. However, if you prefer a chunkier texture, you can leave the peels on. Just remember to wash the apples thoroughly before using them. Peeling the apples allows for a smoother consistency in the final apple butter.
Can I reduce the amount of sugar in the apple butter recipe?
Yes, you can adjust the amount of sugar in the apple butter recipe to suit your taste preferences. However, keep in mind that sugar not only adds sweetness but also helps with preserving the apple butter. If you reduce the amount of sugar, the apple butter may not have the same shelf life. Consider using alternative sweeteners or reducing the sugar gradually to find the right balance for your palate.
How should I store the apple butter after cooking?
To store apple butter after cooking, transfer it to clean and sterilized jars while it is still hot. Make sure to leave about 1/4 inch of headspace at the top of each jar. Seal the jars tightly and let them cool completely. Once cooled, store the jars in a cool, dark place like a pantry or cellar. Properly stored apple butter can last for several months. Once opened, keep the jar refrigerated and consume it within a few weeks.
Final Thoughts
In conclusion, the apple butter copper kettle recipe is a delightful and irresistible treat that can be easily made at home. With just a few simple ingredients and a bit of time, you can create a rich and flavorful apple butter that will elevate any meal or snack. The copper kettle adds a touch of nostalgia and charm to the process, making it a truly memorable experience. Whether you enjoy it spread on toast, swirled into yogurt, or used as a sweet and tangy glaze, the apple butter copper kettle recipe is a must-try for any apple lover.