Chocolate Hand Pies Recipe: Step by Step Guide
This guide provides an accurate step-by-step recipe for making delicious chocolate hand pies. Chocolate hand pies are a delightful treat that are perfect for any occasion.
Whether you’re a seasoned baker or a beginner in the kitchen, this recipe will guide you through the process with easy-to-follow instructions. From making the dough to filling it with rich chocolate filling, these hand pies are sure to satisfy your sweet tooth.
So, gather your ingredients and let’s get baking these scrumptious chocolate hand pies.
Credit: www.acozykitchen.com
Preparing The Dough
Before you can indulge in the blissful delights of chocolate hand pies, you first need to prepare the dough. The foundation of any good hand pie lies in the perfect, flaky crust, and getting the dough just right is essential for a delectable treat.
Mixing The Dry Ingredients
Start by mixing the all-purpose flour, sugar, and salt in a large mixing bowl. Use a whisk to ensure that the dry ingredients are evenly incorporated, ready to receive the next steps.
Incorporating The Butter
Next, take the cold, cubed butter and cut it into the dry ingredients using a pastry cutter or your fingertips. Aim for a pea-sized texture, making sure the butter is evenly distributed throughout the mixture for that flaky texture.
Adding The Wet Ingredients
Once the butter is well incorporated, it’s time to add the ice-cold water gradually. Drizzle a little at a time, gently mixing with a spatula until the dough begins to come together, ensuring it is not too wet or too dry.
Forming The Dough
With the dough starting to take shape, gently bring it together into a ball. Avoid overworking the dough. If necessary, lightly knead the dough a few times to ensure all the ingredients are fully combined, then form it into a thick disk, ready for chilling.
Making The Filling
When it comes to making the filling for chocolate hand pies, selecting the right type of chocolate is crucial.
Choosing The Chocolate
Opt for high-quality bittersweet or semisweet chocolate for a rich and indulgent filling.
Preparing The Chocolate Filling
- Melt chocolate in a heatproof bowl over a pot of simmering water.
- Stir in unsalted butter to create a smooth and glossy texture.
- Add a splash of vanilla extract for an extra layer of flavor.
Ensure each step is done meticulously to achieve a decadent and luscious chocolate filling for your hand pies.
Assembling The Hand Pies
Discover the easy steps to assemble delectable Chocolate Hand Pies with this comprehensive guide. From rolling out the dough to filling each pie with rich chocolate, follow the simple instructions for a delicious homemade treat.
Rolling Out The Dough
Roll the pie dough on a floured surface until it’s about 1/8 inch thick.
Cutting Out The Pie Circles
Use a round cutter to create circles, ensuring they are of the same size.
Adding The Chocolate Filling
- Place a spoonful of rich chocolate filling onto half of the pie circles.
- Leave a small border around the edges to prevent the filling from leaking.
Sealing The Pies
- Top each filled circle with another pie circle.
- Press the edges together using a fork to seal the hand pies.
- Make small slits on the top to allow steam to escape while baking.
- Brush the pies with egg wash for a golden finish.
Baking The Hand Pies
When baking the hand pies, it’s important to pay attention to each step to ensure a delicious and perfectly baked treat. From preheating the oven to brushing with egg wash, the process may seem intricate, but it’s well worth the effort for the delectable outcome. Let’s dive into the step-by-step guide for baking the chocolate hand pies.
Preheating The Oven
To start the baking process, preheat the oven to 375°F. This temperature ensures that the hand pies bake evenly and develop a golden, flaky crust. It’s crucial to allow the oven to reach the desired temperature before placing the pies inside.
Brushing With Egg Wash
Once the hand pies are assembled and ready for the oven, lightly brush each pie with an egg wash. The egg wash adds a glossy finish and helps the pies achieve a beautiful golden brown color during baking. This step enhances the overall presentation and taste of the hand pies.
Baking The Pies
Place the brushed hand pies on a baking sheet lined with parchment paper. Then, carefully transfer the baking sheet to the preheated oven. Bake the hand pies for approximately 20-25 minutes, or until the crust is crisp and golden. Keep a close eye on them to prevent over-browning.
Cooling Before Serving
After removing the hand pies from the oven, allow them to cool for a few minutes on the baking sheet. This short cooling period helps the pies set and firm up, making them easier to handle and serve. Once cooled, the chocolate hand pies are ready to be enjoyed!
Optional Toppings
Discover the versatility of optional toppings for your Chocolate Hand Pies Recipe. Elevate your baking experience with a step-by-step guide that promises a delightful treat every time.
Dusting With Powdered Sugar
The first optional topping for these delicious chocolate hand pies is to dust them with powdered sugar. This simple step adds an extra touch of sweetness and a beautiful presentation to your finished treats. To dust the hand pies with powdered sugar, follow these steps:- Once the hand pies have cooled slightly, place them on a wire rack.
- Using a fine mesh sieve or a sifter, sprinkle a generous amount of powdered sugar over the tops of the pies.
- Gently tap the sieve or sifter to evenly distribute the sugar.
- Continue dusting until each hand pie is lightly coated with powdered sugar.
Drizzling With Melted Chocolate
If you’re a true chocolate lover, drizzling your hand pies with melted chocolate is the perfect finishing touch. This optional topping takes the indulgence to a whole new level. To drizzle the melted chocolate over the hand pies, follow these simple instructions:- Prepare a small microwave-safe bowl and add your desired amount of chocolate chips or chopped chocolate.
- Microwave the chocolate in 20-second intervals, stirring in between, until it is completely melted and smooth.
- Using a spoon or a piping bag, drizzle the melted chocolate over the cooled hand pies in a zigzag pattern.
- Allow the chocolate to set before serving.
Adding A Dollop Of Whipped Cream
For those who love a creamy and luscious touch, adding a dollop of whipped cream on top of these hand pies is the way to go. This optional topping adds a light and airy element to the rich chocolate filling. To add a dollop of whipped cream to your hand pies, here’s what you need to do:- Prepare your favorite whipped cream recipe or use store-bought whipped cream.
- Spoon a generous dollop of whipped cream onto each hand pie.
- For an added touch, sprinkle a pinch of cocoa powder or chocolate shavings on top of the whipped cream.
- Serve immediately and enjoy the combination of the creamy whipped topping with the chocolatey goodness of the hand pies.
Credit: www.browneyedbaker.com
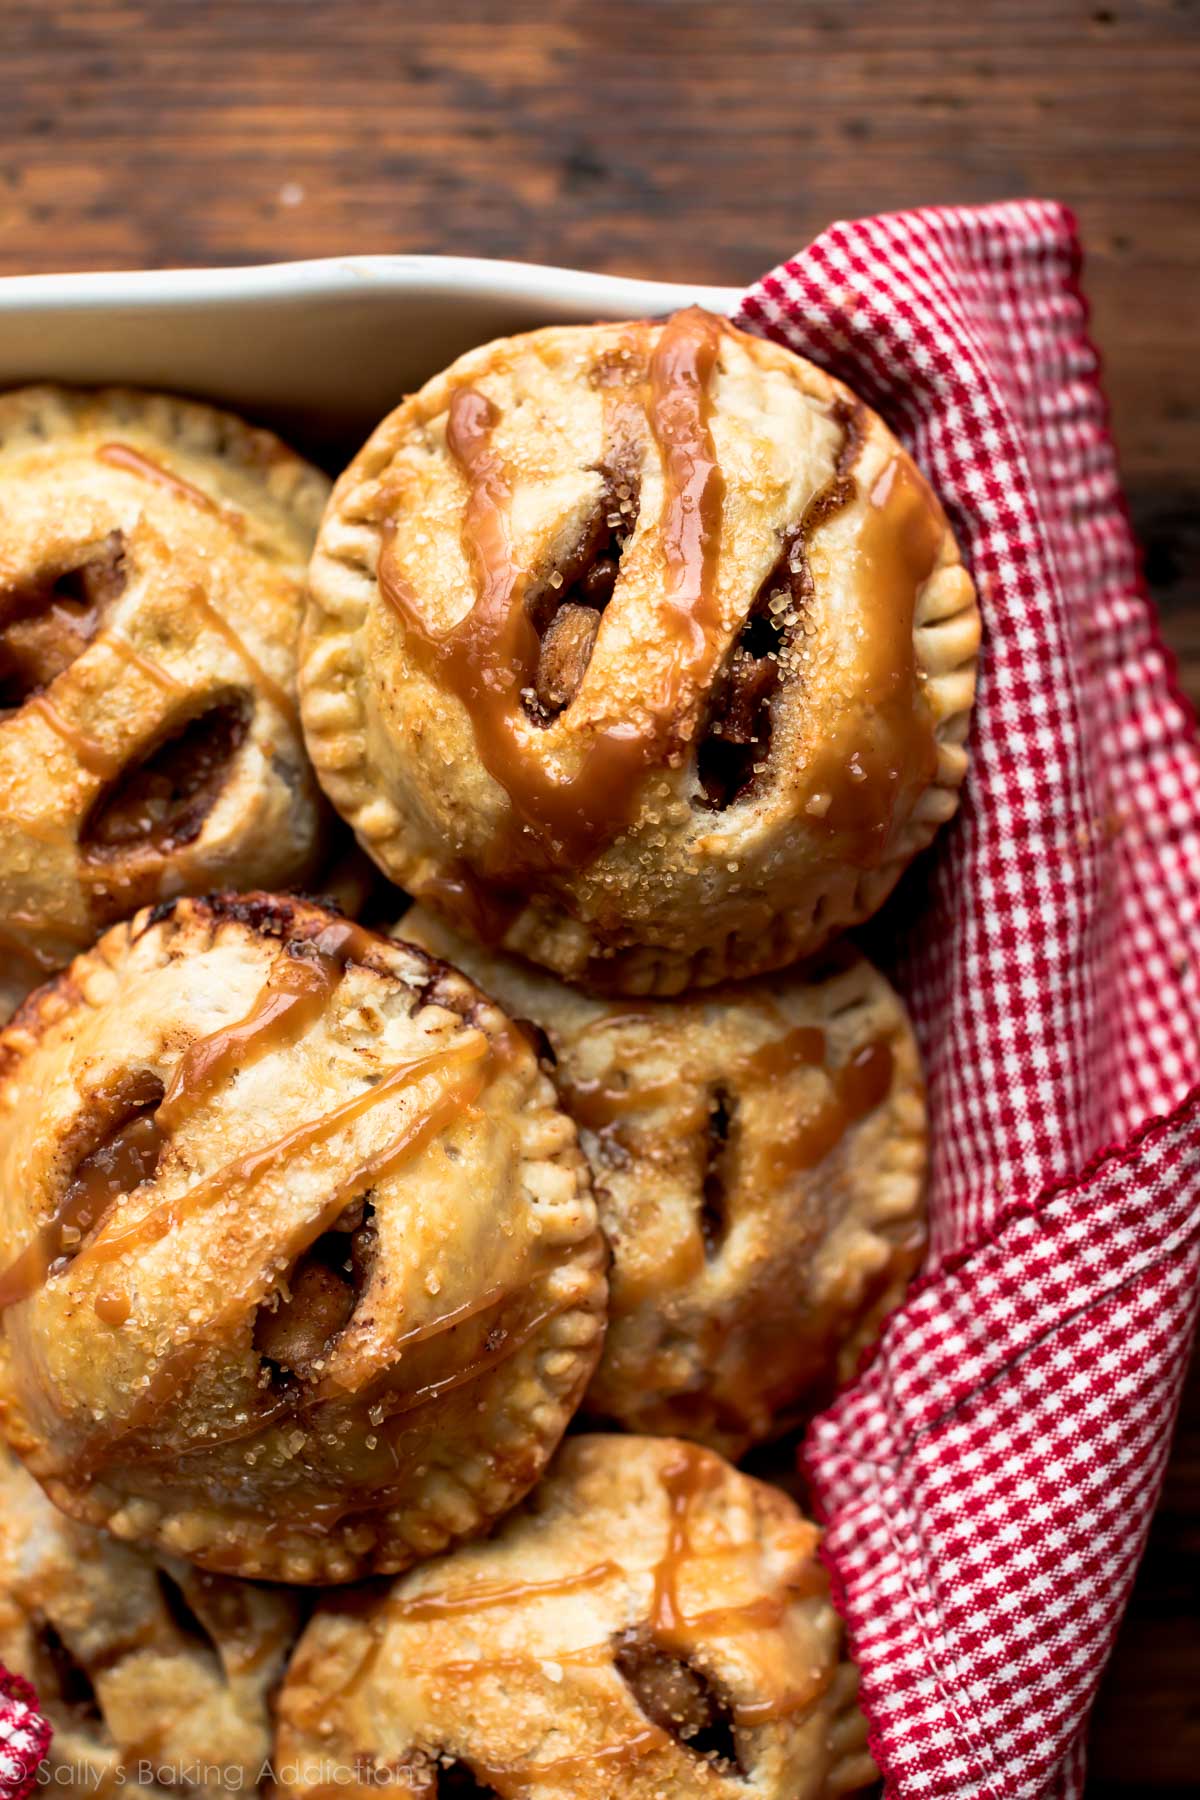
Credit: sallysbakingaddiction.com
Conclusion
In crafting the perfect chocolate hand pies, you’ve managed to elevate a simple dessert into an exquisite culinary masterpiece. By following this step-by-step guide, you’ve unlocked the secret to creating delectable hand pies that are sure to impress. Whether enjoyed as a special treat or shared with loved ones, these chocolate hand pies are a true delight for any occasion.