Chocolate Lollipop Recipe: Step by Step Guide
This step-by-step guide provides an accurate and concise recipe for making chocolate lollipops. Create delicious chocolate treats with just a few simple steps.
Chocolate lollipops are a delightful and fun treat that can be enjoyed by both children and adults. They make perfect party favors, gifts, or simply a tasty snack. Making chocolate lollipops is surprisingly easy, and with this step-by-step guide, you’ll be able to create your own delectable treats in no time.
Whether you’re a novice in the kitchen or an experienced baker, making chocolate lollipops is a great way to indulge your sweet tooth. So, gather your ingredients and let’s dive into this delightful recipe, where you’ll learn how to make chocolate lollipops that are both delicious and visually appealing.
Ingredients
Here are the essential ingredients you’ll need to make delicious Chocolate Lollipops at home:
Chocolate
Quality chocolate is the star of this recipe, opt for dark, milk, or white chocolate depending on your preference.
Lollipop Sticks
Sturdy lollipop sticks will help hold the chocolate and create the classic lollipop shape.
Sprinkles Or Decorations
Add a fun touch to your lollipops with colorful sprinkles or edible decorations to make them visually appealing.
Preparing The Chocolate
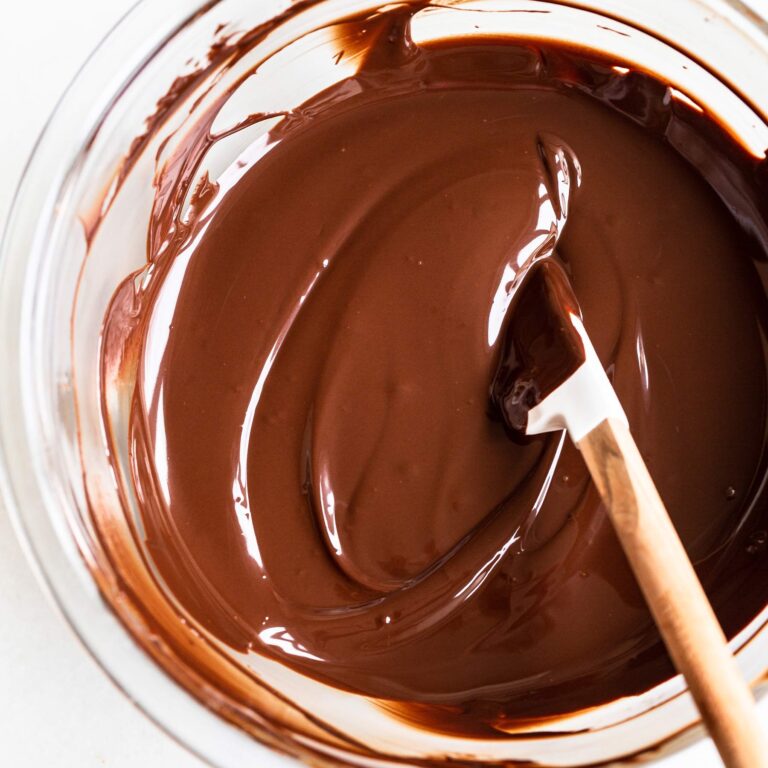
Preparing the chocolate is a crucial step in making delicious chocolate lollipops. The process involves melting the chocolate to the perfect consistency and pouring it into molds, ensuring a smooth and even finish. Let’s dive into the details of each step to achieve the best results.
Melting The Chocolate
To begin, chop the chocolate into small, uniform pieces to ensure even melting. Then, use a double boiler or microwave to gently melt the chocolate, stirring frequently to avoid burning. Be cautious not to overheat the chocolate, as it can become lumpy or lose its smooth texture. Once melted, remove the chocolate from the heat immediately to maintain its glossy finish and prevent scorching.
Pouring The Melted Chocolate Into Molds
After achieving the desired consistency, carefully pour the melted chocolate into the prepared molds. Using a spoon or a ladle, ensure that each cavity is filled evenly to guarantee uniform lollipops. Gently tap the molds on a flat surface to remove any air bubbles and create a professional-looking finish. Allow the lollipops to set at room temperature or in the refrigerator until they are completely solid before removing them from the molds.
Inserting The Lollipop Sticks
Inserting the lollipop sticks into your chocolate lollipops is a crucial step that requires precision and care. By following the step-by-step instructions provided here, you can ensure that your chocolate lollipops turn out perfect every time.
Allowing The Chocolate To Set Slightly
Before inserting the lollipop sticks, it’s important to allow the chocolate to set slightly. This will prevent the sticks from sinking into the chocolate and ensure that they stay in place once inserted. You can achieve this by placing the chocolate-filled molds in the refrigerator for a few minutes, or until the surface of the chocolate has a slightly firm texture.
When inserting the lollipop sticks, ensure that each stick is positioned centrally in the chocolate. Use a gentle twisting motion to push the stick into the chocolate, taking care not to disturb the chocolate too much. Be sure to insert the sticks deep enough to secure them in place, but avoid pushing them all the way through the chocolate.
It’s important to place the sticks evenly and at the same depth to ensure uniformity and professional-looking lollipops. Consider using a ruler or a template to guide the placement of the sticks if needed.

Credit: www.abebooks.com
Decorating The Lollipops
Once your chocolate lollipops have hardened, it’s time to add a touch of creativity and fun with decorations. Whether you’re doing this as a solo endeavor or with children, decorating the lollipops is a delightful part of the process!
Adding Sprinkles Or Decorations
One way to enhance the visual appeal of your chocolate lollipops is by adding sprinkles or decorative toppings. This step allows you to personalize each treat and make them even more eye-catching.
- Prepare an assortment of colorful sprinkles, edible glitter, or small candies.
- Dip each lollipop into a shallow bowl of melted chocolate, then immediately into the sprinkles.
- Rotate the lollipop to ensure even coverage of the decorations.
- Place the decorated lollipop on a parchment-lined baking sheet to set completely.
Allowing The Lollipops To Fully Set
Patience is key when it comes to allowing the lollipops to fully set. This step ensures that the decorations adhere properly and the lollipops maintain their shape when removed from the molds.
- Let the decorated lollipops rest at room temperature for at least an hour.
- For best results, transfer the lollipops to the refrigerator to set for an additional 30 minutes.
- Once fully set, carefully remove the lollipops from the molds by gently twisting them.
Unmolding And Storing
After you have patiently waited for the chocolate lollipops to set, it’s time to unmold them and store them properly to maintain their shape and taste. Follow these simple steps to ensure perfect chocolate lollipops every time.
Carefully Unmolding The Lollipops
Unmolding the chocolate lollipops requires a gentle touch to avoid any damage. Here’s how to do it:
- Place a clean, smooth kitchen towel or silicone mat on your work surface.
- Hold the bottom of the mold firmly and gently tap it on the towel or mat to release the lollipops.
- If the lollipops don’t come out easily, try placing the mold in the refrigerator for a few minutes to firm up the chocolate.
- Once the lollipops are released from the mold, place them on a wire cooling rack to ensure air circulation and prevent any condensation.
By following these steps, you can maintain the beautiful shape and design of your chocolate lollipops.
Storing The Lollipops
Proper storage is crucial to keep your chocolate lollipops fresh and delicious. Here’s what you should do:
- Choose an airtight container or individual cellophane bags to store the lollipops.
- Layer the lollipops in the container or bags, separating each layer with parchment paper or wax paper to prevent sticking.
- Store the container or bags in a cool, dry place away from direct sunlight and high humidity.
- Avoid storing the lollipops in the refrigerator, as the cold temperature can cause the chocolate to develop a dull appearance and absorb odors from other foods.
By storing your chocolate lollipops properly, you can enjoy them for up to two weeks, maintaining their taste and texture.

Credit: www.instagram.com
Variations And Tips
When it comes to making chocolate lollipops, there are various ways to customize and elevate the flavor and presentation. By incorporating different flavors, extracts, and types of chocolate, you can create a diverse array of delectable treats. Here are some variations and tips to enhance your chocolate lollipop recipe.
Adding Flavors Or Extracts
One way to add a unique twist to your chocolate lollipops is by incorporating flavors or extracts. Whether it’s a hint of mint, a burst of citrus, or a dash of vanilla, experimenting with different flavors can yield delightful results. Using high-quality extracts or natural flavorings is key to achieving a balanced and nuanced taste. Incorporate the flavor or extract into the melted chocolate, stirring thoroughly to ensure even distribution.
Incorporating Different Types Of Chocolate
Another way to elevate your chocolate lollipops is by incorporating different types of chocolate. Dark chocolate lends a rich and intense flavor, milk chocolate imparts creaminess, while white chocolate adds a touch of sweetness. Mix and match various types of chocolate to create visually appealing patterns or intriguing flavor combinations. Moreover, consider using chocolate with varying cocoa percentages for a nuanced taste profile.

Credit: www.walmart.com
Conclusion
Elevate your treat game with our easy Chocolate Lollipop Recipe. Customize and share joy! Embrace creativity in the kitchen. The sweetest delights await your culinary adventures. Let your imagination run wild with these delightful and delicious chocolate treats. Share with loved ones and savor the sweet moments together.