Christmas Cookie Challenge Recipes: Step By Step Guide
Looking for Christmas cookie challenge recipes? This step-by-step guide will help you create delicious cookie recipes for the holiday season.
From classic sugar cookies to gingerbread and peppermint treats, you’ll find a variety of recipes to inspire your baking. Whether you’re a novice baker or a seasoned pro, these recipes will guide you through the process of creating beautiful and tasty cookies that will impress friends and family.
With easy-to-follow instructions and helpful tips, you’ll be ready to take on the Christmas cookie challenge with confidence. Get your mixing bowls ready and let’s start baking!
1. Sugar Cookies
Celebrate the holiday season with the delightful tradition of baking sugar cookies. These classic treats are perfect for Christmas Cookie Challenge recipes.
2.1. Ingredients
- 2 3/4 cups all-purpose flour
- 1 tsp baking soda
- 1/2 tsp baking powder
- 1 cup unsalted butter, softened
- 1 1/2 cups white sugar
- 1 egg
- 1 tsp vanilla extract
2.2. Instructions
- Preheat oven to 375°F.
- In a small bowl, stir together flour, baking soda, and baking powder.
- In a large bowl, cream together butter and sugar until smooth.
- Beat in the egg and vanilla.
- Gradually blend in the dry ingredients.
- Roll rounded teaspoonfuls of dough into balls and place onto ungreased cookie sheets.
- Bake 8 to 10 minutes or until golden.
- Cool on wire racks.
- Decorate with icing and sprinkles to add a festive touch!
2. Gingerbread Cookies
Gingerbread cookies are not only a delicious treat, but they also evoke a sense of holiday nostalgia. The warm spices and rich aroma make these cookies a beloved favorite during the Christmas season. Below is a step-by-step guide to creating the perfect batch of gingerbread cookies for your Christmas festivities.
3.1. Ingredients
- 2 1/4 cups all-purpose flour
- 1 teaspoon baking soda
- 1/4 teaspoon salt
- 1 tablespoon ground ginger
- 1 tablespoon ground cinnamon
- 1/2 teaspoon ground cloves
- 1/2 teaspoon ground nutmeg
- 1/2 cup unsalted butter, room temperature
- 1/2 cup granulated sugar
- 1/2 cup molasses
- 1 large egg
- 1 teaspoon vanilla extract
3.2. Instructions
- Preheat your oven to 350°F (175°C) and line a baking sheet with parchment paper.
- In a medium bowl, whisk together the flour, baking soda, salt, ginger, cinnamon, cloves, and nutmeg.
- In a large bowl, using an electric mixer, cream the butter and sugar together until light and fluffy.
- Beat in the molasses, egg, and vanilla until well combined.
- Gradually add the dry ingredients to the wet ingredients, mixing until a dough forms.
- Divide the dough in half, shape each half into a disk, and wrap in plastic wrap. Refrigerate for at least 2 hours.
- Roll out the dough on a lightly floured surface to about 1/4 inch thickness, and cut into desired shapes with cookie cutters.
- Place the cookies on the prepared baking sheet and bake for 8-10 minutes, or until the edges are set and the cookies are firm.
- Allow the cookies to cool on the baking sheet for 5 minutes before transferring to a wire rack to cool completely.
3. Peppermint Bark Cookies
Peppermint bark cookies are a delightful treat that perfectly captures the flavors of the holiday season. These cookies combine the rich taste of chocolate with the refreshing zing of peppermint, creating a winning combination that will leave your taste buds tingling.
4.1. Ingredients
- 1 cup unsalted butter, softened
- 1 cup granulated sugar
- 1 teaspoon vanilla extract
- 2 large eggs
- 2 1/2 cups all-purpose flour
- 1/2 cup cocoa powder
- 1/2 teaspoon salt
- 1/4 teaspoon peppermint extract
- 1 cup semisweet chocolate chips
- 1 cup white chocolate chips
- 1/2 cup crushed peppermint candies or candy canes
4.2. Instructions
- Preheat the oven to 350°F and line baking sheets with parchment paper.
- In a bowl, cream the butter and granulated sugar until light and fluffy.
- Add the vanilla extract and eggs, beating well after each addition.
- In a separate bowl, whisk together the flour, cocoa powder, and salt.
- Gradually add the dry ingredients to the creamed mixture, mixing until well combined.
- Stir in the peppermint extract, semisweet chocolate chips, and white chocolate chips.
- Drop the dough by rounded tablespoons onto the prepared baking sheets.
- Bake for 10-12 minutes or until the edges are set.
- Immediately sprinkle the cookies with crushed peppermint candies while they are still warm.
- Cool the cookies on the baking sheets for 5 minutes before transferring to wire racks to cool completely.

Credit: www.amazon.com
1. Chocolate-dipped Butter Cookies
Chocolate-Dipped Butter Cookies are a delightful treat that combines the rich flavors of chocolate with the buttery goodness of traditional cookies.
6.1. Ingredients
Prepare the following ingredients for the Chocolate-Dipped Butter Cookies recipe:
- 2 cups of all-purpose flour
- 1 cup of unsalted butter, softened
- 1/2 cup of granulated sugar
- 1 teaspoon of vanilla extract
- 1/4 teaspoon of salt
- 8 oz of semisweet chocolate, chopped
6.2. Instructions
Follow these simple steps to make delicious Chocolate-Dipped Butter Cookies:
- Step 1: Preheat the oven to 350°F.
- Step 2: In a mixing bowl, cream the butter and sugar until light and fluffy.
- Step 3: Add the vanilla extract and mix well.
- Step 4: Gradually add the flour and salt, mixing until a dough forms.
- Step 5: Roll the dough into small balls and place them on a baking sheet.
- Step 6: Flatten each ball with a fork and bake for 10-12 minutes.
- Step 7: Once baked, let the cookies cool completely.
- Step 8: Melt the chocolate in a microwave-safe bowl in 30-second intervals.
- Step 9: Dip each cookie halfway into the melted chocolate and place on a wire rack to set.
- Step 10: Allow the chocolate to harden before serving these decadent treats.
2. Cranberry-orange Shortbread
Get ready for a burst of tangy and sweet flavors with our Cranberry-Orange Shortbread cookies. These delightful treats are perfect for the holiday season and will leave your taste buds craving for more. Follow our step-by-step guide below to create these delectable Christmas cookies.
7.1. Ingredients
Here is a list of the ingredients you’ll need to make our Cranberry-Orange Shortbread cookies:
| Ingredient | Quantity |
|---|---|
| All-purpose flour | 2 cups |
| Unsalted butter (softened) | 1 cup |
| Cranberries (dried) | 1/2 cup |
| Orange zest | 2 tablespoons |
| Granulated sugar | 1/2 cup |
| Salt | 1/4 teaspoon |
Make sure to gather all these ingredients before you begin baking.
7.2. Instructions
Follow these simple instructions to make the Cranberry-Orange Shortbread cookies:
- In a bowl, cream the softened butter and granulated sugar until light and fluffy.
- Add the orange zest and salt to the bowl, and mix well to combine.
- Sift the all-purpose flour into the mixture, and stir until the dough comes together.
- Gently fold in the dried cranberries, making sure they are evenly distributed throughout the dough.
- Divide the dough in half and shape each portion into a log. Wrap the logs tightly in plastic wrap and refrigerate for at least 1 hour.
- Preheat your oven to 350°F (175°C) and line a baking sheet with parchment paper.
- Remove the dough logs from the refrigerator and slice them into 1/4-inch thick rounds.
- Arrange the cookies on the prepared baking sheet, leaving some space between each cookie.
- Bake for 12-15 minutes, or until the edges of the cookies turn golden brown.
- Allow the cookies to cool on the baking sheet for a few minutes before transferring them to a wire rack to cool completely.
- Once cooled, you can store the Cranberry-Orange Shortbread cookies in an airtight container for up to a week.
Enjoy the delightful combination of cranberries and orange in every bite of these festive Christmas cookies! They make a perfect accompaniment to a warm cup of tea or a thoughtful homemade gift for your loved ones.
Credit: handletheheat.com
1. Royal Icing Basics
Learn the basics of royal icing for your Christmas cookie challenge recipes with this step-by-step guide. Create beautifully decorated cookies with ease using these simple techniques.
All About Royal Icing
Royal icing is a versatile and essential component for any Christmas baker. This smooth, glossy, and hardening icing is perfect for creating intricate designs and decorations on your holiday cookies. Follow this step-by-step guide to master the royal icing basics. Let’s start with the ingredients you’ll need.9.1 Ingredients
To make royal icing, you will need just three simple ingredients:- 2 large egg whites
- 4 cups (1 pound) powdered sugar
- 1/2 teaspoon of flavor extract (vanilla, almond, or any of your choice)
9.2 Instructions
Follow these steps to prepare the royal icing:- In a clean mixing bowl, add the egg whites.
- Using an electric mixer, beat the egg whites until frothy.
- Sift the powdered sugar into the bowl and gradually incorporate it into the egg whites on low speed. Make sure to scrape down the sides of the bowl to ensure all the sugar is mixed in.
- Continue beating the mixture on low speed until it becomes smooth and shiny. This process usually takes about 5-7 minutes.
- Add in the flavor extract of your choice and beat for an additional 1-2 minutes until well combined.
- If you want to achieve different colors, divide the icing into separate bowls and add food coloring gel. Mix until desired color is achieved.
- Now your royal icing is ready to use for decorating your Christmas cookies!
2. Piping And Flooding Techniques
Mastering the art of piping and flooding techniques is crucial for creating professional-looking Christmas cookies. These methods involve using different consistencies of royal icing to achieve intricate designs and vibrant colors on your cookies.
10.1. Tools Needed
To successfully execute piping and flooding techniques, you will need a few essential tools. Make sure you have the following items on hand:
- Piping bags
- Piping tips in various sizes and shapes
- Couplers for changing tips easily
- Toothpicks or scribe tools for fine details
10.2. Instructions
Follow these step-by-step instructions to perfect your piping and flooding techniques:
- Prepare your royal icing in different consistencies: thick for outlining (piping) and thin for filling in (flooding).
- Fill your piping bag with the thicker icing and outline the design on your cookie using steady pressure.
- Allow the outline to set for a few minutes before thinning the icing to flooding consistency and filling in the outlined areas.
- Use a toothpick or scribe tool to spread the flooded icing evenly and remove any air bubbles.
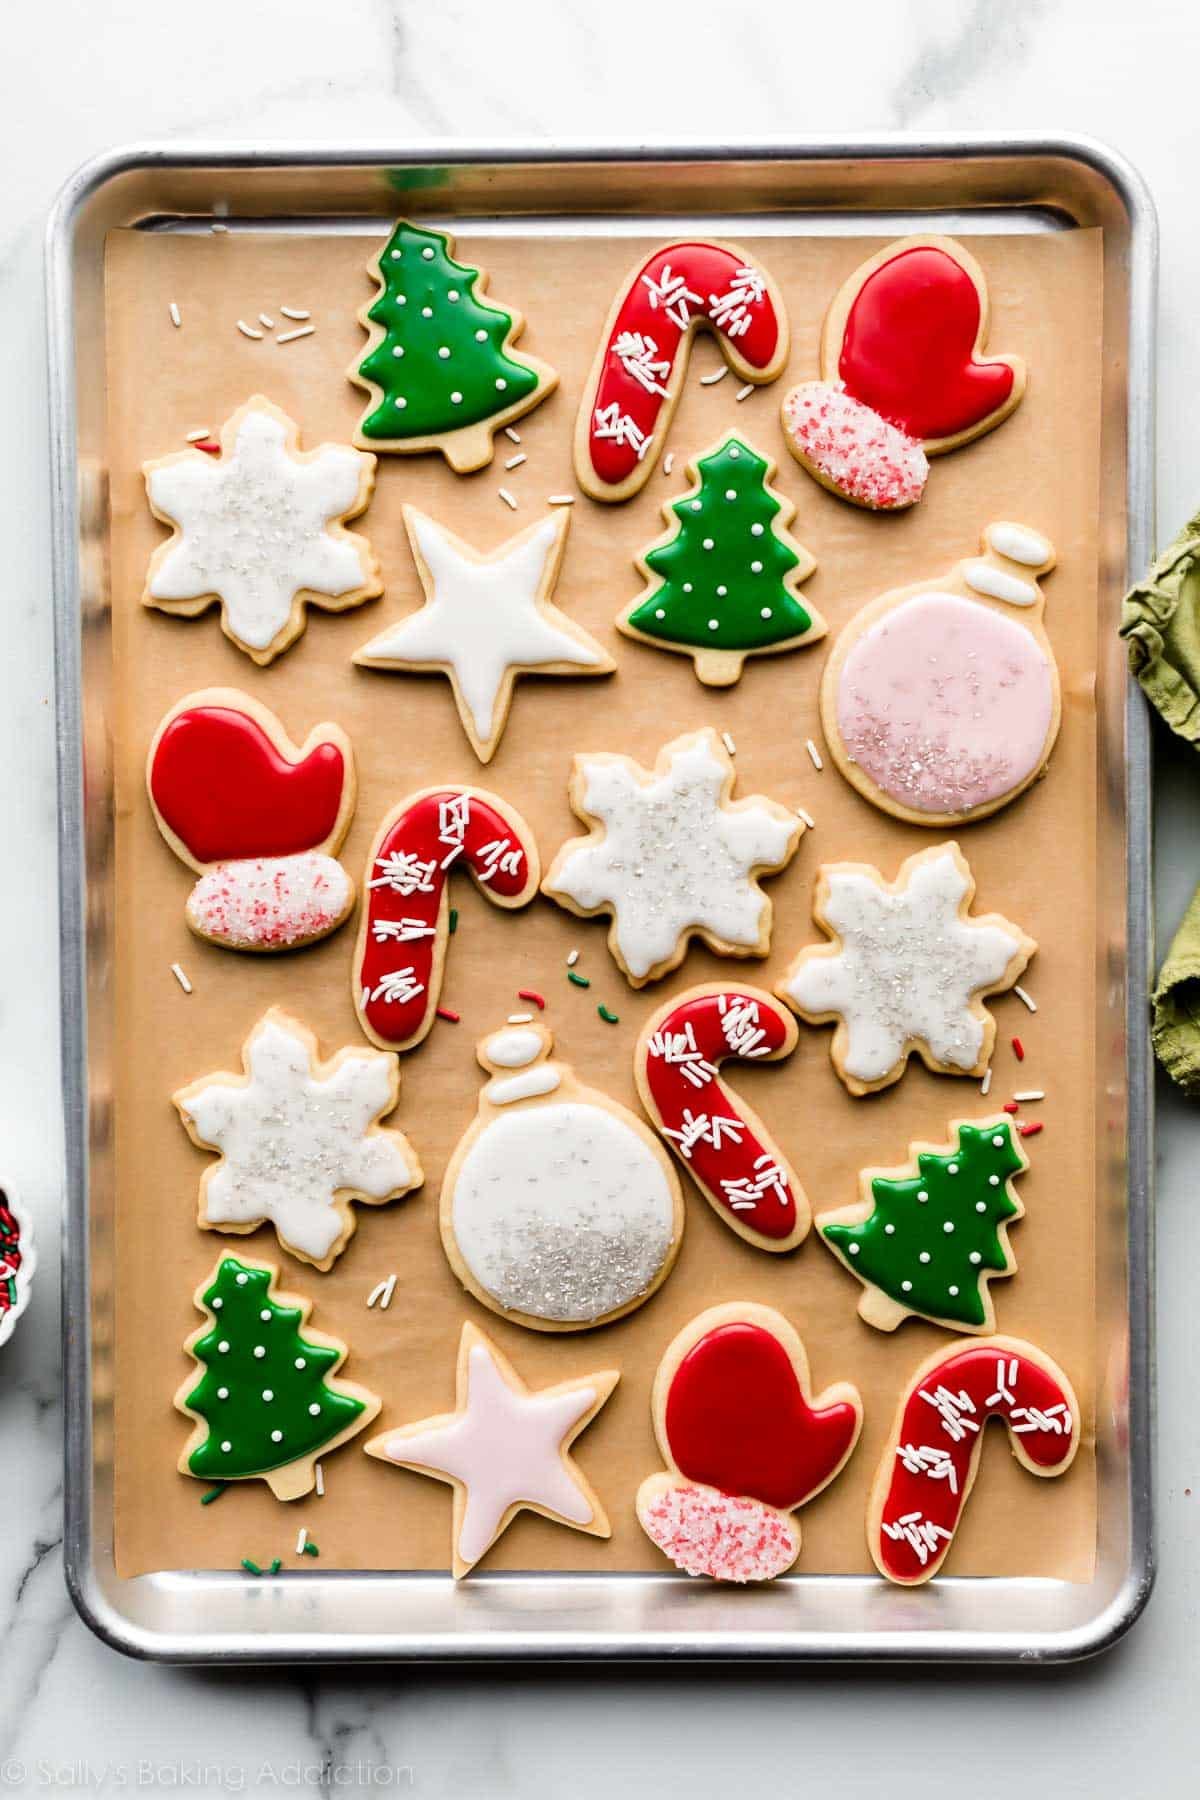
Credit: sallysbakingaddiction.com
1. Preparing The Dough
When it comes to Christmas baking, there’s no denying the joy that comes from making delicious cookies. One of the most crucial steps in creating perfect Christmas cookies is preparing the dough. The right technique can make all the difference in achieving that delectable texture and flavor. Let’s dive into the step-by-step guide to preparing the dough for your Christmas Cookie Challenge recipes.
12.1 Mixing Ingredients
Mixing the ingredients for your Christmas cookie dough is where the magic begins. It’s essential to ensure that all the ingredients are well-combined to achieve the perfect cookie texture. Here’s a simple recipe for classic sugar cookie dough:
- Ingredients:
- 2 1/2 cups all-purpose flour
- 3/4 teaspoon baking powder
- 1/4 teaspoon salt
- 1 cup unsalted butter, softened
- 1 cup granulated sugar
- 1 large egg
- 2 teaspoons vanilla extract
- Instructions:
- Cream the butter and sugar together until light and fluffy.
- Add the egg and vanilla extract, and beat well.
- In a separate bowl, sift together the flour, baking powder, and salt.
- Gradually add the dry ingredients to the wet ingredients, mixing until fully incorporated.
- Once combined, shape the dough into a disk, wrap it in plastic wrap, and chill it for at least one hour before rolling.
12.2 Chilling The Dough
Chilling the dough is a crucial step in the cookie-making process. This helps the dough to firm up, preventing the cookies from spreading too much while baking. Here’s how to properly chill the cookie dough:
- Wrap: After mixing the dough, shape it into a disk and wrap it tightly in plastic wrap.
- Refrigerate: Place the wrapped dough in the refrigerator and chill it for at least one hour, or overnight for best results.
- Preparation: Before rolling and cutting the dough, let it sit at room temperature for a few minutes to make it more pliable.
2. Perfecting Baking Time And Temperature
When it comes to baking cookies for Christmas, perfecting the baking time and temperature is crucial. Not only does it ensure that your cookies are baked to perfection, but it also helps to bring out the flavors and textures that we all love. In this step-by-step guide, we will be discussing the importance of oven settings and how to test for doneness.
13.1 Oven Settings
To start off, let’s talk about the oven settings. Preheating your oven is an essential step that should not be overlooked. By preheating, you are allowing the oven to reach the desired temperature, which ensures that your cookies bake evenly and consistently.
Most cookie recipes call for a temperature of around 350°F (175°C). However, it’s important to note that different ovens may have variations in temperature accuracy. To ensure that your cookies bake perfectly, use an oven thermometer to verify that your oven is indeed heated to the correct temperature.
Additionally, the type of oven you are using may also affect the baking time and temperature. Convection ovens, for example, circulate the hot air, resulting in faster and more even baking. If you are using a convection oven, you may need to adjust the temperature and baking time accordingly. Refer to your oven’s manual for specific instructions.
13.2 Testing For Doneness
Once you have set the oven to the correct temperature, it’s time to start baking. But how do you know when the cookies are done? Testing for doneness is an important skill that every baker should master.
One method to test for doneness is the touch test. Gently tap the center of the cookie with your fingertip. If it feels firm and springs back slightly, then your cookies are done. If it leaves an indentation or feels too soft, then they need a bit more time in the oven.
Another common method is the toothpick test. Insert a toothpick into the center of the cookie. If it comes out clean or with a few crumbs, then your cookies are perfectly baked. If the toothpick comes out with wet batter, then they need more time to bake.
Remember, the baking time can vary depending on the size and thickness of your cookies, so keep a close eye on them as they bake. It’s better to start with the minimum recommended time and then adjust accordingly.
In conclusion, achieving the perfect baking time and temperature is key to creating delicious Christmas cookies. By paying attention to oven settings and testing for doneness, you can ensure that each batch of cookies comes out just right – with a golden brown color, crispy edges, and a soft, chewy center. Happy baking!
Conclusion
In a whirlwind of flour and sugar, these Christmas cookie recipes are bound to impress. Whether classic or creative, the step-by-step guide guarantees picture-perfect results. The festive flavors and cozy baking vibes will surely elevate your holiday spirit. Get ready to bake, share, and enjoy the sweet rewards!