Bread Basket Recipe: A Delicious And Easy Guide
Looking for a delicious and eye-catching addition to your next brunch or dinner spread? Look no further! In this blog article, we’ll unveil a scrumptious bread basket recipe that will leave your guests in awe. With just a few simple ingredients and a little bit of creativity, you can easily craft a stunning edible basket filled with a variety of fresh and tasty breads. So, whether you’re hosting a special occasion or simply want to impress your family and friends, this bread basket recipe is sure to elevate your culinary skills and become a favorite in no time. Let’s dive right in!

Bread Basket Recipe
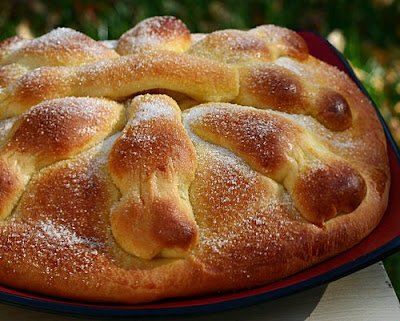
One of the most versatile and beloved baked goods, bread has been a staple in cuisines around the world for centuries. The aroma of freshly baked bread wafting through the air is enough to make anyone’s mouth water. But have you ever considered taking your bread game to the next level by creating a bread basket? Imagine a beautiful, edible centerpiece that not only looks impressive but also offers a variety of flavors and textures to accompany your meals. In this article, we will guide you through the process of making a delightful bread basket that will elevate any dining experience.
Ingredients
Before we dive into the step-by-step process of creating a bread basket, let’s take a look at the ingredients you’ll need:
- 3 cups all-purpose flour
- 2 teaspoons active dry yeast
- 2 teaspoons sugar
- 1 teaspoon salt
- 1 cup lukewarm water
- 2 tablespoons olive oil
- Assorted herbs and spices for flavor (optional)
Step 1: Activate the Yeast
The first step in making your bread basket is to activate the yeast. In a small bowl, combine the lukewarm water, sugar, and yeast. Stir gently and let it sit for about 5 minutes until the mixture becomes frothy. This indicates that the yeast is active and ready to be used.
Step 2: Mix the Dough
In a large mixing bowl, combine the flour and salt. Create a well in the center and pour in the activated yeast mixture and olive oil. If desired, you can also add herbs and spices at this stage to infuse your bread with additional flavors. Using a wooden spoon or your hands, mix the ingredients together until a dough forms.
Step 3: Knead the Dough
Transfer the dough onto a lightly floured surface and begin kneading. Push the dough away from you with the heel of your hand and then fold it back over. Rotate the dough a quarter turn and repeat the process. Continue kneading for about 10 minutes until the dough becomes smooth and elastic.
Step 4: Let the Dough Rise
Place the kneaded dough in a greased bowl and cover it with a clean kitchen towel or plastic wrap. Allow the dough to rise in a warm, draft-free area for about 1 to 2 hours or until it doubles in size. This process, known as proofing, allows the yeast to ferment and produce carbon dioxide, which gives the bread its light and airy texture.
Step 5: Shape the Bread Basket
Once the dough has risen, it’s time to shape your bread basket. Punch down the dough to release any air bubbles and transfer it back to a lightly floured surface. Divide the dough into two equal portions. Take one portion and roll it into a large circle, approximately 12 inches in diameter.
Next, take a round baking dish or a bowl with a diameter of your choice and invert it onto a baking sheet lined with parchment paper. Gently drape the rolled dough over the inverted dish, allowing the excess to hang over the sides. Press the dough lightly against the sides of the dish to create the basket shape.
Repeat this process with the second portion of dough, placing it on a separate baking sheet. You now have two bread baskets ready for baking.
Step 6: Bake the Bread Baskets
Preheat your oven to 375°F (190°C) and place both baking sheets with the bread baskets inside. Bake for approximately 20 to 25 minutes or until the bread turns golden brown and sounds hollow when tapped. Keep an eye on the baskets as baking times may vary depending on the size and thickness of the dough.
Once baked, remove the bread baskets from the oven and let them cool on a wire rack. Carefully lift the baked baskets off the inverted dishes and peel away the parchment paper.
Step 7: Serve and Enjoy!
Your beautiful bread baskets are now ready to be filled with an array of delicious treats. Whether you prefer savory or sweet fillings, the possibilities are endless. Here are some ideas to get you started:
- Herbed cream cheese with smoked salmon
- Roasted vegetable medley
- Caprese salad with fresh mozzarella, tomatoes, and basil
- Fruit salad with a drizzle of honey
- Sundried tomato and feta cheese
- Chicken or tuna salad
- Whipped butter and jams
Get creative and experiment with different combinations to suit your taste preferences. The bread baskets not only add visual appeal to your table but also provide a convenient and edible vessel for serving a variety of appetizers, side dishes, or even desserts.
In conclusion, creating a bread basket is a rewarding and enjoyable baking project that will impress your family and guests. From the moment you activate the yeast to the final filling, the process allows you to unleash your creativity and experiment with different flavors. So why not elevate your next meal by serving it in a homemade bread basket? With this recipe and a dash of imagination, you’ll have a stunning centerpiece that will delight both the eyes and the taste buds. Happy baking!
Bread Basket Recipe – Edible Bread Basket
Frequently Asked Questions
What ingredients do I need to make a bread basket?
To make a bread basket, you will need the following ingredients:
- 2 ½ cups all-purpose flour
- 1 ¼ teaspoons active dry yeast
- 1 teaspoon salt
- 1 cup warm water
- 2 tablespoons olive oil
How do I shape the bread dough into a basket?
To shape the bread dough into a basket, follow these steps:
- After the dough has risen, punch it down and turn it out onto a floured surface.
- Divide the dough into small pieces and roll each piece into a rope shape.
- Twist two ropes together to form a braid. Repeat with the remaining ropes.
- Place the braided ropes on a baking sheet lined with parchment paper in a circle, with the ends overlapping.
- Press the ends together to seal the dough and create a circular shape.
What is the baking time and temperature for the bread basket?
The bread basket should be baked in a preheated oven at 375°F (190°C) for approximately 20-25 minutes, or until the top is golden brown.
Can I add different flavors or toppings to the bread basket?
Absolutely! You can customize your bread basket by adding various flavors and toppings. Some popular options include herbs and spices like rosemary or garlic, grated cheese, or even sesame seeds. Simply sprinkle or brush the desired toppings onto the bread dough before baking.
How should I store the leftover bread basket?
To store the leftover bread basket, allow it to cool completely and then transfer it to an airtight container or a resealable plastic bag. It is best consumed within 2-3 days. To refresh the bread, you can warm it in the oven for a few minutes before serving.
Final Thoughts
The bread basket recipe offers a delightful way to serve bread, adding an elegant touch to any meal or gathering. With its crispy outer layer and soft interior, the bread basket is sure to please your taste buds. It is a versatile recipe, allowing you to experiment with different flavors and fillings. Whether you choose to fill it with a variety of breads or create a savory filling, the bread basket is a guaranteed crowd-pleaser. So, next time you want to impress your guests or simply indulge in a delicious treat, try out the bread basket recipe.